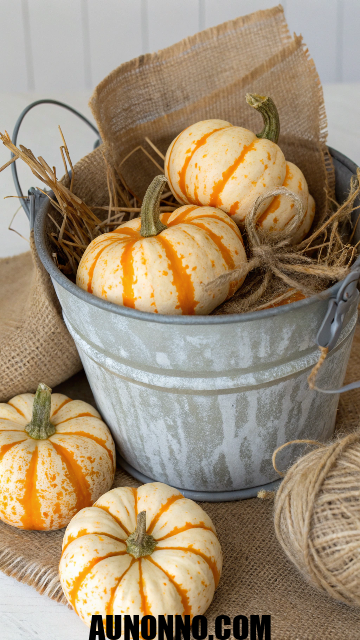
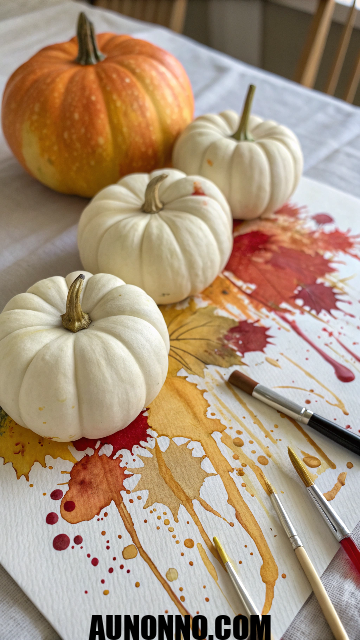
Mini pumpkins are the perfect canvas for creative fall decorating. Painting these adorable gourds lets you skip the mess of carving while creating stunning seasonal displays that last for weeks.
From simple polka dots to intricate galaxy designs, mini pumpkin painting gives you endless options to express your style and bring autumn warmth into your home.
Classic Halloween Monster Faces
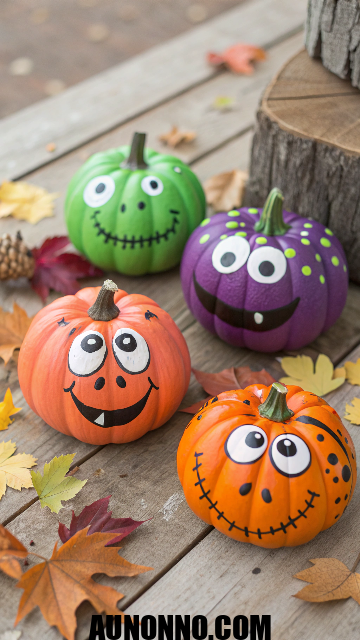
Transform your mini pumpkins into friendly monsters that bring smiles instead of scares. Start by painting the entire pumpkin with a solid base color like orange, green, purple, or black using acrylic paint. Once the base coat dries completely, use a small paint brush to add two circular eyes in white paint.
The fun begins when you add personality with simple facial features. Paint two small white dots inside each eye for highlights, then add a curved smile using black paint or a paint marker. Create different expressions by varying the mouth shapes – some can have toothy grins while others sport silly smirks.
For extra character, use the back end of a small paint brush dipped in pink paint to add rosy cheeks on either side of the smile. Small details like triangle teeth for vampires or grey spiky hair for witches take these monster pumpkins from basic to brilliant. These painted creatures make perfect decorations for kid-friendly Halloween parties.
Elegant Polka Dot Design
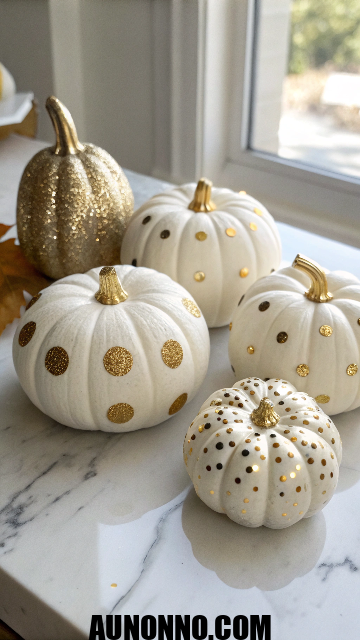
Polka dot pumpkins bring timeless sophistication to any fall display. Begin by painting your mini pumpkins with a solid base color and allowing them to dry completely. Choose contrasting colors for maximum impact – white dots on black pumpkins create dramatic elegance while gold dots on navy create a luxurious feel.
Use daubers or spouncers (sponges on sticks) for perfectly round dots. Dip the tool in thick acrylic paint, then use a “punch and twist” motion on the pumpkin surface. This spinning action ensures complete circle coverage without gaps.
Create visual interest by varying dot sizes across the pumpkin. While dots are still wet, sprinkle glitter over them for extra sparkle. Work in small sections so the paint stays wet enough for the glitter to adhere properly. These polished pumpkins work beautifully as table centerpieces or mantel decorations that complement both rustic and modern decor styles.
Stunning Galaxy Effect
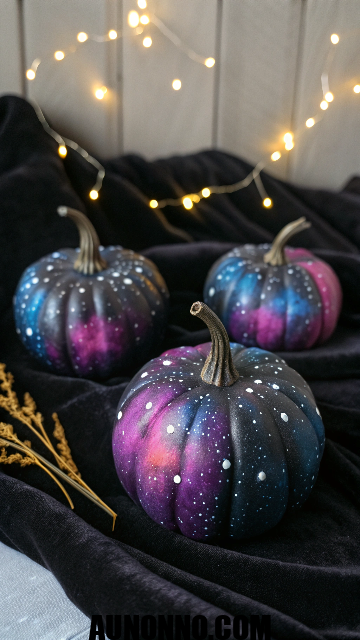
Bring the cosmos into your fall decor with mesmerizing galaxy pumpkins. Paint the entire mini pumpkin black to create your night sky base. Allow this foundation coat to dry completely before moving to the next step.
Use a stippling technique with purple, blue, and pink acrylic paints to create nebula effects. Dab these colors randomly across the black surface using a small sponge or paintbrush. Blend the edges where colors meet for a natural cosmic look.
Add stars by watering down white or silver paint and flicking it onto the pumpkin with a stiff paintbrush or old toothbrush. The splatters create realistic starlight effects. For advanced designs, drill small holes to represent constellations like Orion or Ursa Minor, then place LED lights inside for a glowing effect. These celestial pumpkins make stunning statement pieces that spark conversation.
Charming Woodland Animals
Turn mini pumpkins into adorable forest creatures using felt and paint. Paint your pumpkin in the base color of your chosen animal – brown for deer, grey for raccoons, or orange for foxes. Let the base coat dry thoroughly.
Cut felt pieces for ears, tails, and other distinctive features. For an owl, create two circular eye bases from felt, glue on googly eyes, add a small triangle beak, and attach wing shapes on the sides. Bend pipe cleaners for realistic bird feet.
For a raccoon, the signature mask and ringed tail make it instantly recognizable. Cut black felt for the eye mask and grey with black stripes for the bushy tail. Add small white dots for eyes and a tiny smile. These charming woodland creatures bring whimsical nature vibes to your autumn arrangements and work perfectly for both indoor mantels and covered porch displays.
Vibrant Rainbow Ombre
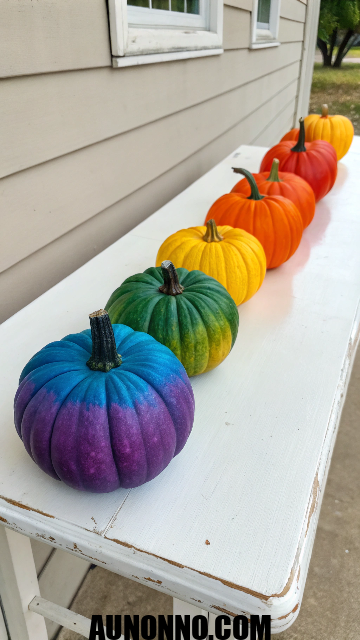
Create a stunning rainbow display with ombre-painted mini pumpkins. Select six to eight mini pumpkins and choose rainbow colors plus intermediate shades. Start with your darkest color and paint two pumpkins.
Mix in small amounts of the next color to lighten the shade gradually. Paint the next set of pumpkins with this new blend. Continue this process, adding more of the lighter color each time to create a seamless gradient effect.
The key to successful ombre lies in having enough transitional shades between your main colors. Display these pumpkins in a row from darkest to lightest for maximum visual impact. This technique works beautifully with traditional autumn colors like burgundy fading to orange, or create something unexpected with pastels or jewel tones. Rainbow ombre pumpkins bring cheerful energy to any space and photograph beautifully for social media.
Sophisticated Marble Effect
Marble pumpkins deliver high-end designer looks with surprisingly simple techniques. Fill a large plastic bowl with lukewarm water about two-thirds full. Gather nail polish in your chosen colors – black and white create classic marble while pastels offer softer elegance.
Pour small amounts of nail polish onto the water surface, working quickly as it spreads. Use a toothpick to swirl the colors into marbled patterns. Hold your white mini pumpkin by the stem and slowly roll it through the floating nail polish design.
Pull the pumpkin out carefully and let it drip over the water before setting it on newspaper to dry. The nail polish transfers instantly, creating unique marbled designs that never repeat. Each pumpkin becomes a one-of-a-kind art piece. These luxe-looking pumpkins elevate your fall decor with minimal effort and make impressive gifts for design-loving friends.
Adorable Succulent Style
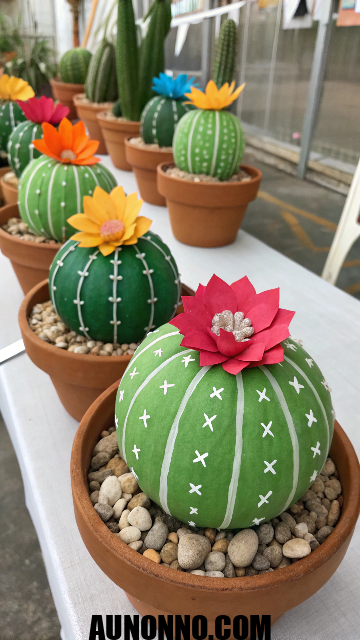
Cactus-inspired pumpkins bring desert vibes to autumn decorating. Spray paint your mini pumpkins in various shades of green – from sage to emerald. Allow the paint to dry completely in a well-ventilated area.
Paint white X marks randomly across the green surface to represent cactus needles. You can use white cardstock to cut out small X shapes and hot glue them on instead of painting for a dimensional effect. Arrange these marks in vertical lines along the natural grooves of the pumpkin for authenticity.
Top some pumpkins with mini honeycomb balls in pink, orange, or yellow to represent cactus blooms. For extra realism, place these painted cacti in terracotta pots filled with moss. Create different heights by using various pumpkin sizes to mimic different cactus varieties. These quirky pumpkins add unexpected charm and work year-round as non-seasonal decor.
Delicate Floral Patterns
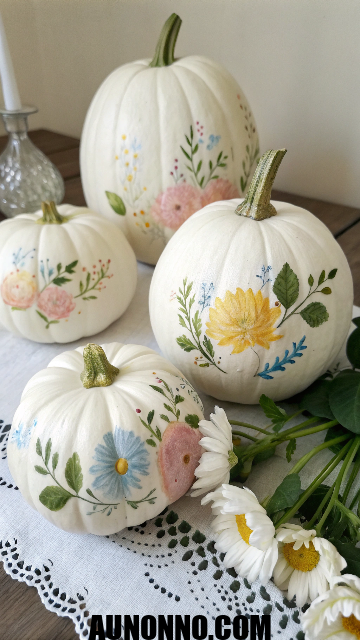
Hand-painted flowers transform mini pumpkins into botanical masterpieces. Start with white or pastel-colored mini pumpkins for the best canvas. If needed, paint a solid background color first and let it dry.
Use a fine-tipped paintbrush to create small curved stems in green paint around the pumpkin surface. Add wavy leaves extending from the stems. Paint simple five-petaled flowers in various colors like pink, yellow, blue, and purple along the stems.
Create depth by painting some flowers larger in the foreground and smaller ones in the background. Add white or dark centers to each bloom for definition. Small abstract flowers made with just a few brushstrokes fill in empty spaces beautifully. These garden-inspired pumpkins evoke cottagecore aesthetics and work perfectly for spring-into-fall transitional decorating or autumn weddings.
Bold Geometric Triangles
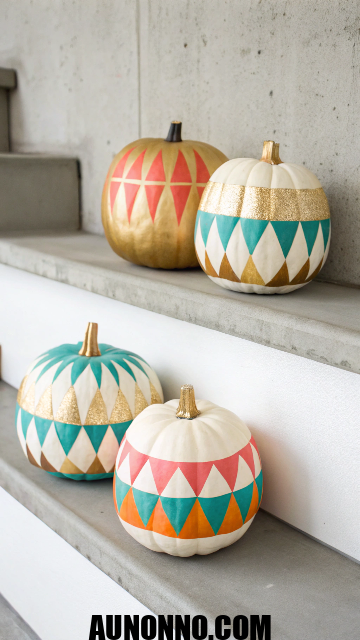
Geometric patterns give mini pumpkins modern artistic flair. Paint your pumpkins in solid base colors like white, grey, or pastels. Once dry, use a pencil to lightly draw small triangles across the surface.
Start with one triangle, then draw another adjacent to it with flat sides facing and small gaps between them. Continue adding triangles in a randomized pattern. Keep the spacing between shapes consistent for a professional look.
Use a small angled paintbrush to fill in the triangles with contrasting colors like gold, black, or bright accent shades. The geometric design can cover the entire pumpkin or create an artistic patch on one side. Erase any visible pencil marks once the paint dries completely. These contemporary pumpkins suit mid-century modern and minimalist home styles while bringing artistic sophistication to traditional fall displays.
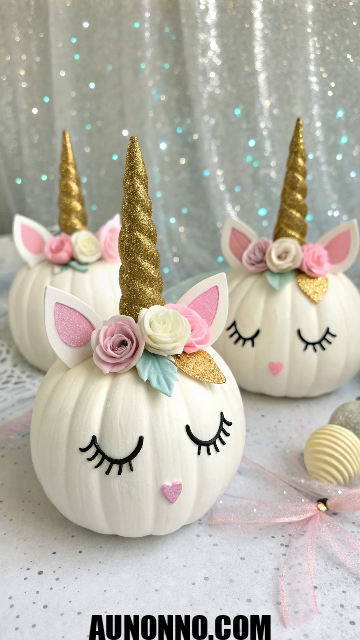
Whimsical Unicorn Design
Unicorn pumpkins add magical enchantment to your fall decorations. Paint your mini pumpkin with white acrylic paint as the base, applying two coats for full coverage. Let it dry completely between coats.
Create a beautiful unicorn horn using glitter cardstock cut into a cone shape. Secure it to the top of the pumpkin around the stem area. Cut ear shapes from foam sheets and glue them on either side of the horn.
Paint two perfect pink circles on the front for rosy cheeks using a small round brush. Add closed eyelashes with black paint or a fine marker to create a sweet sleeping expression. Use additional glitter, foam flowers, or ribbons to decorate around the horn for extra sparkle. These fantasy-inspired pumpkins delight children and adults alike while bringing fairytale magic to seasonal decorating.
Festive Polka Dot Confetti
Confetti-style pumpkins burst with celebratory energy. Gather colorful tissue paper in various autumn shades or use pre-cut confetti circles. Cut the tissue into small circles if making your own – stacking several sheets together makes this faster.
Working in small sections, brush Mod Podge onto the pumpkin surface. Place individual tissue paper circles onto the wet adhesive, overlapping them slightly. Continue layering confetti pieces until you achieve your desired coverage.
Brush another coat of Mod Podge over the completed design to seal everything in place. The adhesive dries clear, leaving vibrant color pops across your pumpkin. This technique works beautifully with white or orange pumpkins and creates a festive party atmosphere. Kids love helping with this project since the technique is forgiving and the colorful results are instantly rewarding.
Sparkling Gold Drip Effect
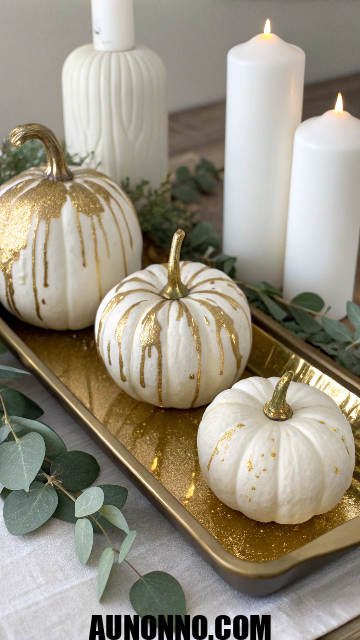
Gold drip pumpkins exude glamorous sophistication. Choose pumpkins in white, cream, or soft pastel shades for the best contrast. Position your pumpkin upside down while working for easier application.
Use gold metallic craft paint and old paintbrushes to create a wavy drip line around the top circumference of the pumpkin. Make deliberate peaks in the line to enhance the dripping effect. Fill in all the space above this line with gold paint, leaving the drips as distinct features.
Let the first coat dry, then apply a second for full metallic coverage. The irregular drip patterns add organic movement to the design. For extra dimension, use rose gold or copper paint instead of traditional gold. These elegant pumpkins elevate tablescapes for formal autumn dinners and look stunning when grouped with candles and metallic accents in your decor.
Spooky Skeleton Figures
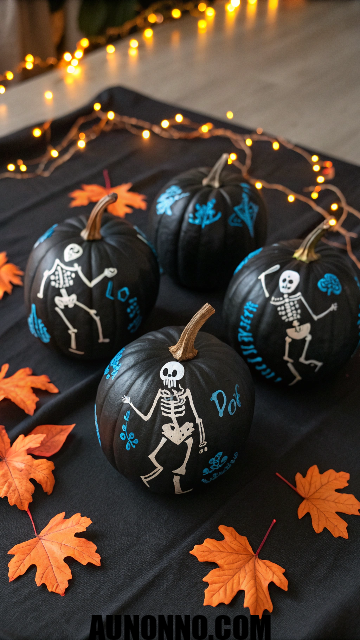
Skeleton-decorated pumpkins balance spooky and playful perfectly. Paint mini pumpkins in black or dark purple as your base color using acrylic paint. Apply two coats for solid coverage.
Use white paint or paint pens to draw skeleton figures on the front. Keep the designs simple with round heads, ribcages, and stick limbs. Make them dance, wave, or strike silly poses for personality.
Add dimension by outlining the skeletons in bright blue or neon colors for a Day of the Dead inspired look. Small white dots around the design create additional decorative interest. These playful skeletons appeal to both children and adults who appreciate Halloween decorations with humor. Display them with orange pumpkins for classic color contrast or group them with other black-painted designs for a gothic aesthetic.
Rustic Whitewash Technique
Whitewashed pumpkins bring farmhouse charm to fall decorating. Select natural pumpkins in traditional orange or interesting heirloom varieties. Mix white acrylic paint with a small amount of water to create a thin consistency.
Use a flat craft brush to apply the diluted paint in long, streaky strokes across the pumpkin surface. Work quickly and avoid fully covering the natural color. The goal is creating an antiqued, weathered appearance with the orange pumpkin showing through in places.
Let some sections have heavier coverage while others show more of the base color. This inconsistency creates authentic vintage appeal. The whitewash technique requires no artistic skill yet delivers impressive results. These rustic beauties fit perfectly in farmhouse, cottage, and country decor schemes while adding subtle sophistication to outdoor displays.
Cute Animal Faces
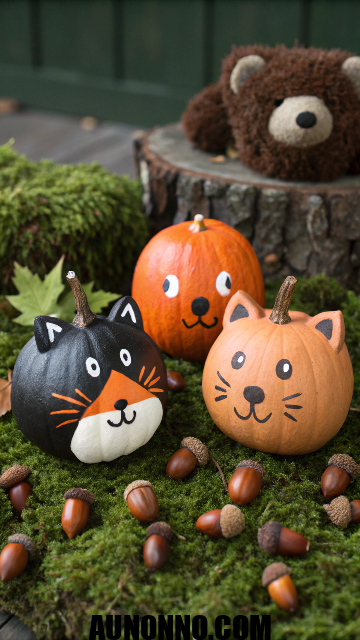
Animal face pumpkins create instant personality and charm. Paint your mini pumpkin black for a cat, orange for a fox, or keep it natural for other creatures. Once your base dries, draw two large circles for eyes using white paint.
Add black circular pupils in the center of each eye, leaving a small white highlight dot at the top. Paint a small triangular or circular nose below the eyes in contrasting color. Use a fine brush to add whiskers extending from the sides.
Different animals need specific features – cats get pointed ears from black felt, foxes need white chest markings, and bears require rounded ears. Simple additions like pink inner ears or a red tongue add extra cuteness. These adorable creations appeal to animal lovers of all ages and make wonderful gifts or party favors for children’s autumn celebrations.
Elegant Pressed Flowers
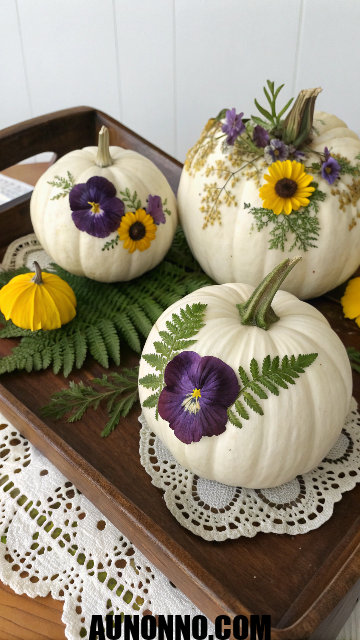
Pressed flower pumpkins combine natural beauty with artistic expression. Choose white or light-colored mini pumpkins for the best background. Purchase pressed flowers or create your own by pressing flat blooms like pansies, daisies, or cosmos in heavy books.
Arrange your pressed flowers on the pumpkin before gluing to plan your design. Small flowers around one to two inches work best for mini pumpkins. Apply thin layers of Mod Podge to the pumpkin where you want flowers.
Carefully place each pressed flower onto the wet adhesive, gently brushing more Mod Podge over the top to seal. Continue adding flowers and greenery until you achieve your desired look. These botanical pumpkins showcase the delicate beauty of preserved flowers while celebrating autumn’s harvest. They work wonderfully as table settings for Thanksgiving dinners or as thoughtful handmade gifts.
Playful Donut Style
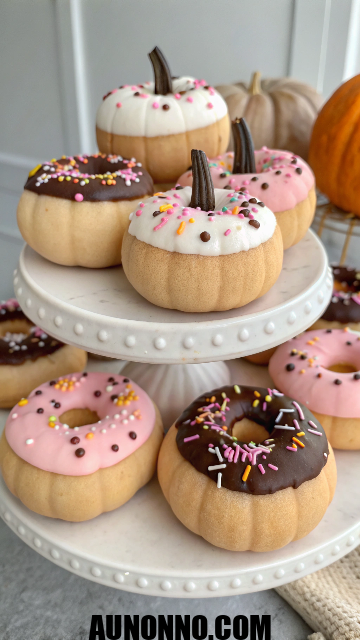
Donut pumpkins satisfy sweet tooth decorating cravings without the calories. Paint the bottom half of your mini pumpkin in tan or light brown to represent the donut base. Once dry, flip it over and paint a circle around the stem area.
Paint the top half in icing colors like white, pink, brown, or mint green. Use a tiny paintbrush to add colorful sprinkles all over the icing section using various paint colors. Make the sprinkles small and scattered randomly for authenticity.
Add dimension by painting a thin darker line where the icing meets the donut to create shadow. These whimsical food-inspired pumpkins bring humor to your fall decor. Kids especially love these playful designs that combine favorite treats with seasonal decorating. Display them on cake stands or in baskets lined with checkered cloth for a bakery-inspired presentation.
Striking Black and White Stripes

Striped pumpkins deliver classic elegance with timeless appeal. Paint your entire mini pumpkin white using acrylic paint and allow it to dry completely. Use the natural vertical grooves in the pumpkin as guides for straight lines.
Paint alternating grooves in black, creating vertical stripes around the pumpkin. Make the stripes as thick or thin as you prefer. For consistent results, use painter’s tape to mask off sections before painting if you want perfectly straight edges.
Paint the stem black for a cohesive finished look. This monochromatic design offers sophisticated simplicity that complements any color scheme. Stripe patterns work with various color combinations beyond black and white – try navy and gold for nautical vibes or pink and white for feminine charm. These versatile pumpkins transition easily from Halloween through Thanksgiving decorating.
Creative Watercolor Drips
Watercolor pumpkins showcase artistic flair with their flowing organic patterns. Choose white or light-colored mini pumpkins as your canvas. Gather several colors of liquid watercolor or thinned acrylic paints in autumn shades.
Apply paint to the top of the pumpkin and let gravity pull the colors downward, creating natural drips. Layer multiple colors for a rainbow effect. The colors will blend where they meet, creating beautiful transitions.
Work on newspaper or a protected surface since this technique can get messy. Let colors drip all the way to the bottom or stop them midway for different effects. Each pumpkin becomes unique since you cannot precisely control the drip patterns. These artistic pumpkins appeal to creative souls who appreciate abstract art and bring vibrant energy to your seasonal displays.
Festive Halloween Characters
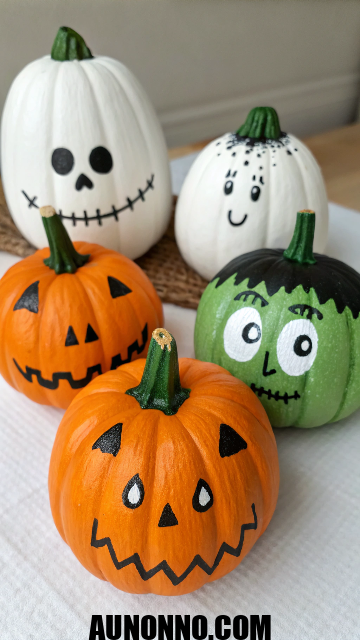
Character pumpkins bring beloved Halloween icons to life. Paint mini pumpkins orange for jack-o’-lanterns, white for ghosts, or black for witches. Simple features make these characters instantly recognizable without advanced artistic skills.
For ghosts, use a cotton swab dipped in black paint to create two round eyes and an oval mouth in surprised expression. Witches need pointed black hats made from felt or cardstock plus simple triangle noses. Frankenstein characters get green base paint with black hair sections and neck bolts drawn on the sides.
Add personality with different expressions – some scary, some silly, some surprised. Small details like rosy cheeks or googly eyes increase the charm factor. These character pumpkins work perfectly for family-friendly Halloween parties and create wonderful craft projects for children who want to participate in seasonal decorating.
Shimmering Metallic Finish
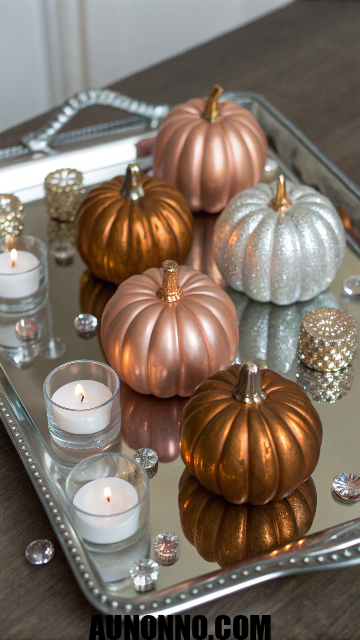
Metallic pumpkins add luxurious shine to autumn arrangements. Spray paint mini pumpkins with metallic finishes in copper, rose gold, silver, or bronze. Apply thin, even coats from a distance to avoid drips.
Let the first coat dry completely before adding a second for full coverage. The reflective surfaces catch light beautifully and create visual interest. Mix metallic pumpkins with natural ones for contrast in your displays.
Group metallic pumpkins by finish or create an ombre effect using bronze, copper, and gold together. Add spray adhesive and glitter for extra sparkle if desired. These glamorous gourds elevate any space from casual to elegant and photograph beautifully for social media posts. They work year-round as decor since the metallic finishes do not scream Halloween or fall, making them versatile decorating investments.
Enchanting Starry Night
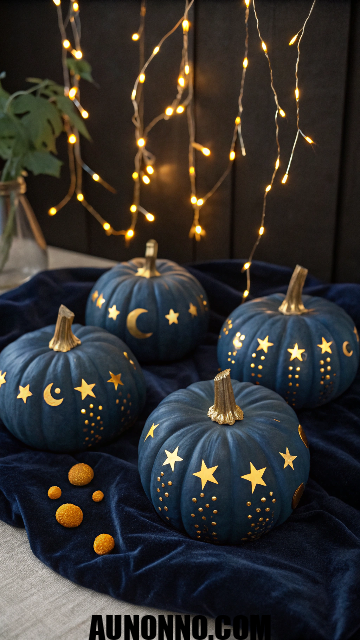
Star-patterned pumpkins capture celestial magic in miniature form. Paint your mini pumpkin with deep navy or black acrylic paint as the night sky base. Allow this foundation to dry completely.
Use a bamboo skewer or pencil to poke small holes through the pumpkin in random patterns to represent stars. Vary the hole sizes for realistic star variation. For additional detail, paint white or gold stars on the surface using a fine brush or paint pen.
Add a crescent moon shape in metallic gold or silver paint for focal interest. Create constellation patterns by connecting star dots with thin lines. Place battery-operated LED lights inside to make the stars glow from within. These mystical pumpkins bridge the gap between Halloween spookiness and sophisticated fall decor while adding magical ambiance to evening displays.
Boho Henna Patterns
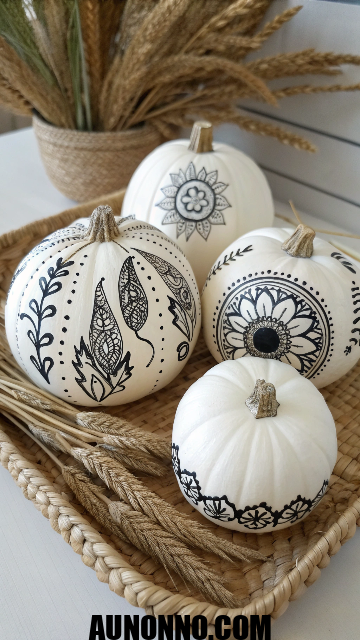
Henna-inspired pumpkins showcase intricate beauty with ethnic flair. Choose white or light neutral pumpkins for the best contrast with dark patterns. Use black paint pens or fine brushes with black acrylic paint.
Draw flowing curved lines that follow the pumpkin’s natural contours. Add teardrops, dots, small flowers, and paisley shapes along the curves. Traditional henna patterns include mandala-like circular designs around the stem.
Work slowly and carefully, letting sections dry before adding adjacent details to prevent smudging. Reference henna tattoo designs online for inspiration and pattern ideas. These bohemian beauties bring worldly sophistication to fall decorating and appeal to those who love intricate detail work. Display them with dried flowers, macrame, and natural textures for a complete boho aesthetic.
Cheerful Rainbow Patterns
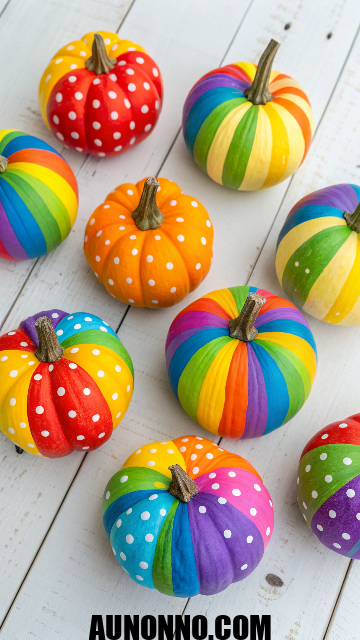
Rainbow pumpkins spread joy with their vibrant multicolor designs. Paint horizontal stripes in rainbow order around your mini pumpkin – red, orange, yellow, green, blue, purple. Use painter’s tape between colors for crisp lines if desired.
Create rainbow dot patterns by painting rows of colored dots circling the pumpkin. Mix painting techniques by combining stripes on one pumpkin and dots on another. Let each color dry before applying the next to prevent muddy mixing.
These colorful creations work perfectly for kids’ rooms, playrooms, or anywhere you want to inject cheerful energy. Rainbow pumpkins celebrate diversity and inclusivity while bringing non-traditional colors into fall decorating. They photograph beautifully and bring smiles to everyone who sees them. Group rainbow pumpkins together for maximum impact or scatter them throughout traditional orange pumpkin displays for pops of unexpected color.
Frequently Asked Questions
What type of paint works best for mini pumpkins?
Acrylic craft paint works best for painting mini pumpkins since it adheres well to the surface, dries quickly, and provides excellent coverage. The thick consistency prevents running and dripping. You can also use spray paint for solid base coats, which saves time when painting multiple pumpkins.
For fine details, paint pens or markers give you precise control. Always apply at least two coats for full opacity and let each coat dry completely between applications.
How do I prepare mini pumpkins before painting?
Clean your mini pumpkins with a damp cloth to remove any dirt, debris, or waxy residue from the surface. This step ensures smooth paint application and proper adhesion. Let the pumpkins dry completely after cleaning, or wipe them with a dry cloth.
Some people apply a bleach or vinegar bath to help preserve pumpkins longer, though this is optional. Choose pumpkins without soft spots or blemishes for the best results. Working with a clean, smooth surface makes painting easier and produces professional-looking results.
Can I use real pumpkins or should I choose artificial ones?
Both real and artificial pumpkins work well for painting projects. Real mini pumpkins cost less and provide authentic texture, but they will eventually deteriorate. Artificial foam or plastic pumpkins last indefinitely and can be reused year after year. If using real pumpkins, keep them away from direct sunlight and extreme temperatures to extend their lifespan.
Painted real pumpkins typically last several weeks to a few months when stored properly. Choose artificial pumpkins if you want permanent decorations that can be stored and displayed for multiple seasons.
How long do painted mini pumpkins last?
Real painted mini pumpkins generally last three to eight weeks depending on storage conditions and the pumpkin’s initial freshness. Keep them in cool, dry locations away from direct sunlight to maximize longevity. The paint actually helps seal the pumpkin surface, which can extend its life. Artificial painted pumpkins last indefinitely when stored properly between seasons.
If your paint starts chipping on artificial pumpkins, you can easily touch it up or repaint them. Display painted pumpkins indoors rather than outdoors where weather exposure shortens their lifespan significantly.
Do I need to seal painted pumpkins?
Sealing painted pumpkins is optional but recommended for outdoor displays. Apply a clear acrylic sealer or UV protectant spray over finished designs to protect them from moisture and fading. This coating prevents paint from chipping or peeling, especially important if pumpkins will be handled frequently. For indoor displays, sealing is less critical but still adds durability.
Mod Podge works as both an adhesive and sealant for decoupage projects using tissue paper, napkins, or pressed flowers. Let paint dry completely for 24 hours before applying any sealant to prevent smudging.
What brushes should I use for detailed designs?
Use a variety of brush sizes for different aspects of your design. Foam brushes work perfectly for applying solid base coats over large areas quickly and smoothly. Small round brushes with fine tips allow you to paint intricate details like flowers, eyes, and patterns. Angled brushes help with geometric shapes and straight edges.
Daubers or spouncers (sponges on sticks) create perfect polka dots. For galaxy effects and blending, small sponges work beautifully. Keep separate brushes for light and dark colors to avoid contamination, and clean brushes thoroughly between different paint colors.
Can kids help with mini pumpkin painting?
Mini pumpkin painting makes an excellent family activity that kids can absolutely participate in. Simple designs like polka dots, stripes, and basic faces are perfect for young artists. Fingerprint painting on pumpkins lets even toddlers create festive decorations.
How do I prevent paint from chipping?
Prevent paint chipping by properly preparing your pumpkin surface before painting. Clean pumpkins thoroughly and let them dry completely.
Apply thin, even coats rather than thick layers that crack as they dry. Let each coat dry fully before adding the next one. Use quality acrylic paints formulated for craft projects rather than cheap alternatives.
What if I make a mistake while painting?
Mistakes are easily fixable when painting mini pumpkins. While acrylic paint is still wet, simply wipe it away with a damp paper towel or cloth. Once paint dries, you can paint over mistakes with your base color and start that section again.
The beauty of acrylic paint is its opacity, so lighter colors can cover darker ones with multiple coats.
Where should I display painted mini pumpkins?
Display painted mini pumpkins anywhere you want to add festive fall charm. Group several together on mantels, coffee tables, or dining tables for impactful centerpieces. Scatter them along staircase railings or windowsills for subtle seasonal touches.
Place mini pumpkins in decorative bowls, baskets, or trays for contained displays. Use them as place settings or party favors for autumn gatherings.
Conclusion
Mini pumpkin painting ideas offer endless creative possibilities for transforming simple gourds into stunning seasonal decorations.
From elegant marble effects to playful character designs, these painted treasures bring personality and warmth to your home throughout fall.