Finding the perfect manicure for February 14th can feel like a big task. You want something that expresses love but still matches your personal style.
This list of 26 valentines day nails designs offers options ranging from subtle minimalism to bold, romantic statements for everyone to enjoy.
Classic Red French Tips
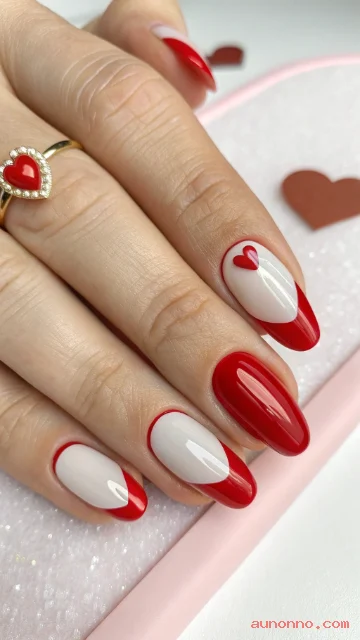
The French manicure gets a romantic update with bright cherry red tips. This look replaces the traditional white line with a bold pop of color that screams Valentine’s Day. It is a subtle nod to the holiday without being overwhelming or too busy for everyday wear.
Red tips look amazing on both short, natural nails and longer almond shapes. You can keep the base nude or sheer pink to let the red really stand out. This design works perfectly for a dinner date or a casual Galentine’s brunch with friends.
Adding a tiny heart accent on the ring finger can elevate this simple style. Use a dotting tool to place a small red heart right near the cuticle line. It adds a secret detail that makes the manicure feel special and customized for the occasion.
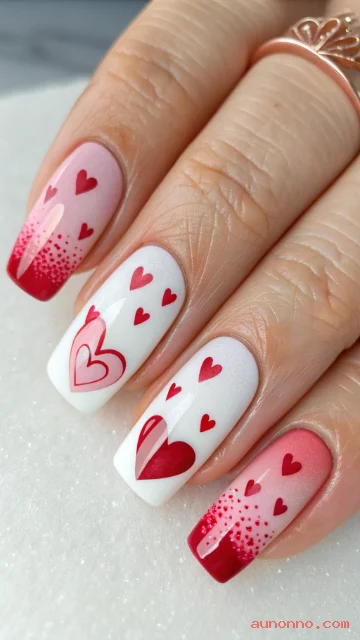
Micro Heart Minimalism
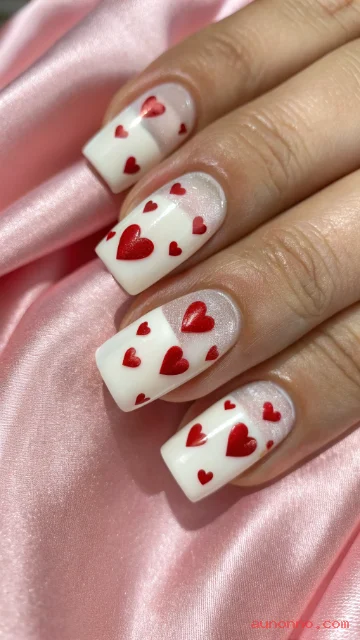
Tiny patterns are trending this year, and micro hearts are leading the pack. This design involves painting a sheer, milky base coat over the entire nail first. Then, you place one or two extremely small hearts on each nail using black or red polish.
The beauty of this style lies in its clean and understated appearance. It is perfect for someone who works in a conservative office environment but still wants to celebrate. The negative space keeps the look fresh and modern rather than cluttered.
You can mix up the placement of the hearts for a playful effect. Put one near the tip on your thumb and another near the cuticle on your index finger. This random placement makes the design feel organic and effortlessly chic.
Velvet Pink Cat Eye
Velvet nails use magnetic polish to create a textured, dimensional look that shimmers in the light. A soft pink velvet finish mimics the look of crushed fabric on your fingertips. This technique adds depth and luxury to your manicure without needing crystals or stickers.
The magnetic effect creates a silver or gold shift when you move your hand. It catches the light beautifully and looks different from every angle. This dynamic finish is a great conversation starter and feels incredibly festive for a romantic evening.
To achieve this, you need a special cat-eye gel polish and a strong magnet. Hold the magnet over the wet polish to direct the metallic particles before curing. The result is a soft, fuzzy appearance that looks just like expensive velvet material.
Negative Space Hearts
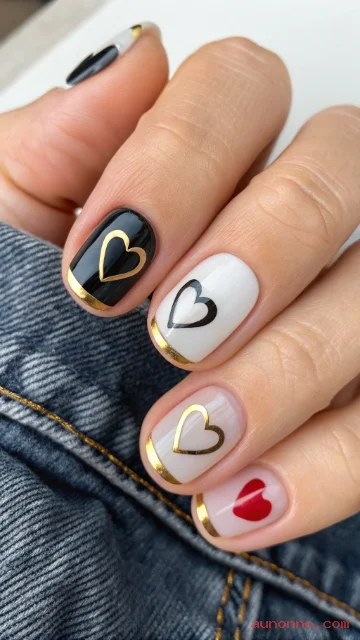
Negative space designs use your natural nail color as part of the art. This look features heart shapes outlined or filled in, leaving the rest of the nail bare or clear. It is an edgy and artistic take on traditional Valentine’s themes.
You can use tape or stencils to block out heart shapes before painting. Alternatively, a steady hand and a fine liner brush can paint the negative space boundary. This style grows out gracefully since there is no harsh line near the cuticle.
Try using unexpected colors like black or metallic gold for the heart outlines. This moves the design away from traditional pinks and reds. It creates a modern, high-fashion vibe that pairs well with leather jackets and denim.
Pearl Accents and Nude
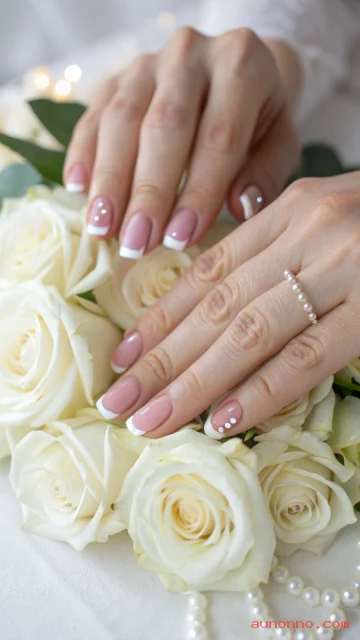
Pearls add an instant touch of elegance and sophistication to any manicure. Start with a classic nude or pale pink base that matches your skin tone. Glue small, flat-backed pearls near the cuticle or scattered across the nail surface.
This textured 3D element transforms a basic manicure into jewelry for your hands. It feels bridal and romantic, making it perfect for Valentine’s Day. Just be sure to use strong nail glue so the pearls stay put all night.
You can vary the size of the pearls for a more dynamic look. Mix tiny seed pearls with slightly larger ones on an accent nail. Keep the rest of the nails simple to let the texture shine without looking messy.
Glitter Ombré Fade
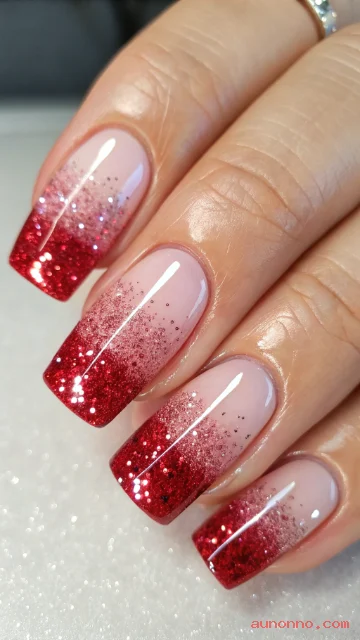
Glitter ombré is a festive way to add sparkle without committing to a full glitter nail. Start with a clear or nude base and sponge glitter onto the tips. Fade the glitter down toward the middle of the nail for a cascading effect.
Red or pink chunky glitter works best for the Valentine’s theme. The gradient effect softens the look and makes it more wearable than a solid glitter coat. It reflects light beautifully and looks amazing in candlelit settings.
This design is surprisingly easy to do at home with a makeup sponge. Dab the sponge lightly to build up opacity at the very tip. Seal everything with a thick glossy top coat to smooth out the texture of the glitter.
“Love” Lettering
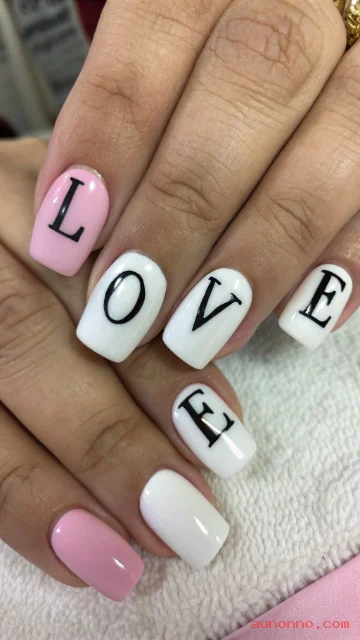
Spell out your feelings directly on your nails with cute lettering. Paint each nail a solid color like white or soft pink to serve as a canvas. Use a thin brush or decals to write “L-O-V-E” across your fingers.
You can write one letter per nail or put short words on accent nails. Gothic fonts look cool and edgy, while cursive script looks soft and romantic. Choose a font style that matches your personality and outfit.
Black ink on white nails creates a striking, newspaper-print aesthetic. Red ink on pink nails offers a sweeter, candy-heart vibe. Ensure the letters are legible by keeping the background color solid and contrasting.
Chromatic Rose Gold
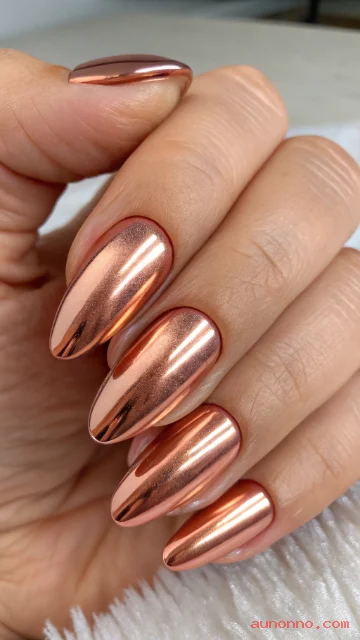
Chrome powder creates a mirror-like finish that is futuristic and sleek. Rose gold chrome is the perfect metal tone for Valentine’s Day. It combines the warmth of copper with the romance of pink in a high-shine package.
Apply the powder over a cured gel top coat for the best mirror effect. Rub it in until the surface is completely reflective and smooth. This look is impactful enough that you don’t need any extra nail art or gems.
Rose gold looks beautiful on all skin tones and nail lengths. It is a more modern alternative to standard pink polish. The high-shine finish hides imperfections and makes your nails look professionally done.
Sweetheart Candy Pastels
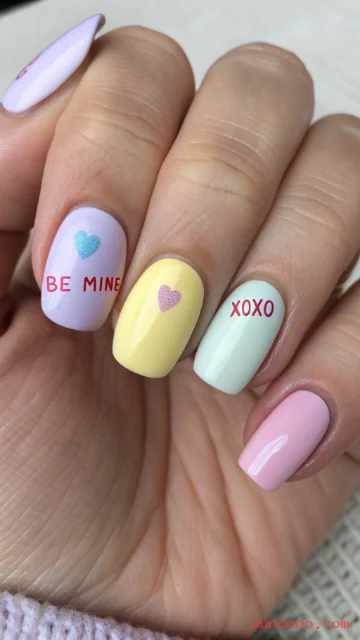
Recall the nostalgia of conversation hearts with a pastel color palette. Paint each nail a different soft shade like lavender, mint, yellow, and baby pink. This multicolor look is fun, youthful, and breaks away from the strict red-and-pink rule.
The matte finish makes these colors look even more like the classic candies. Use a matte top coat over your regular polish to achieve this effect. It gives the manicure a velvety, soft-touch appearance that is very trendy.
You can add tiny red text phrases like “BE MINE” or “XOXO” if you have steady hands. If not, the colors alone convey the sweet theme perfectly. It is a playful choice for a casual date or a party.
Gothic Black Hearts
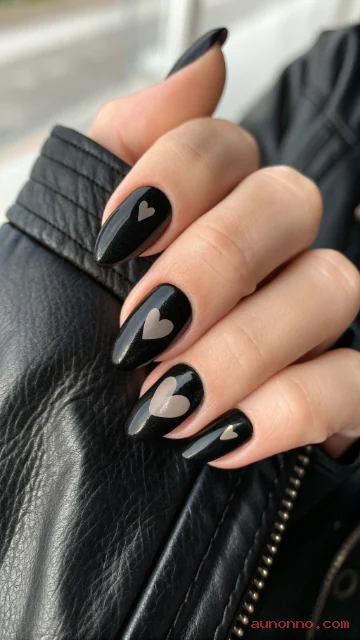
Valentine’s Day doesn’t have to be all bright and cheery colors. A black manicure with heart details is perfect for the anti-Valentine or edgy aesthetic. Use a glossy black base and add matte black hearts for a subtle texture contrast.
Alternatively, paint a nude base and add sharp, black heart tips. This twist on the French manicure is dark, moody, and sophisticated. It pairs exceptionally well with silver jewelry and monochromatic outfits.
This design proves that love can be expressed in any color palette. It is bold, rebellious, and stands out in a sea of red nails. Perfect for a rock concert date or a night out at a moody bar.
Jelly Sandwich Nails
Jelly nails have a translucent, glass-like finish that looks juicy and fun. Create a “sandwich” by layering sheer polish, glitter or confetti, and another layer of sheer polish. This creates depth where the glitter looks suspended inside the nail.
Use a sheer strawberry red or raspberry pink for the jelly layers. Embed heart-shaped confetti in the middle layer for a festive touch. The result is a squishy, dimensional look that catches the eye.
This style was huge in the 90s and has made a major comeback. It is playful and youthful, perfect for a fun daytime date. The translucent color makes the nails look like fruit snacks or hard candy.
Abstract Swirls
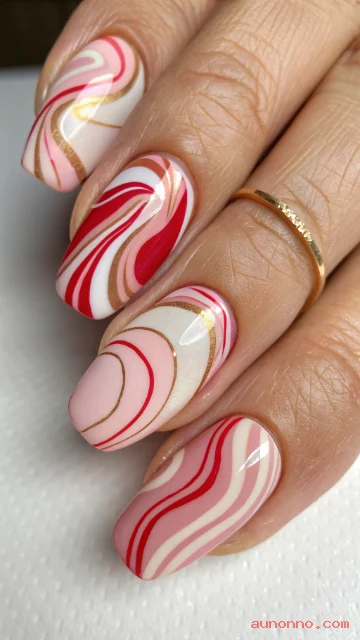
Swirls and waves are a versatile design that can be adapted for any holiday. Use shades of pink, red, and white to create flowing lines across a nude base. The organic shapes are forgiving to paint and don’t need to be symmetrical.
This 70s-inspired retro look is groovy and artistic. You can make the lines thick or thin depending on your preference. It adds movement and energy to your nails without being overly literal with hearts.
Mixing a metallic gold line in with the pink swirls adds a touch of glamour. It elevates the design from casual to evening-ready. Use a long, thin liner brush to get the smoothest curves possible.
Coquette Bows
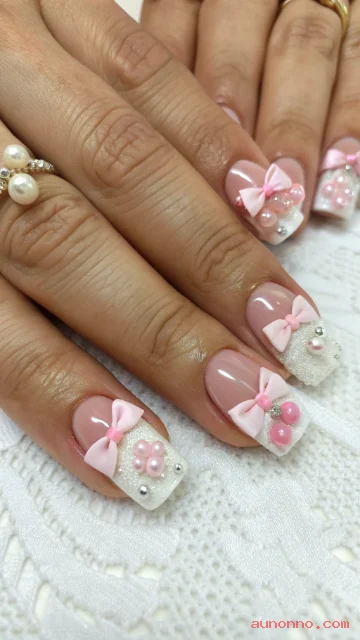
The coquette aesthetic is all about hyper-feminine details like ribbons and lace. Paint small, delicate bows on your nails for a dainty and sweet look. Soft pinks, creams, and whites are the best colors for this style.
You can paint the bows freehand or use 3D nail charms for texture. A 3D bow adds a cute, tactile element that is very popular right now. Place the bow at the cuticle or the tip of the nail.
This design pairs perfectly with pearl jewelry and floral dresses. It is innocent, charming, and very “balletcore.” It captures the soft, romantic side of Valentine’s Day perfectly.
Aura Gradient
Aura nails feature a soft, blooming circle of color in the center of the nail. Use a sponge or an airbrush tool to diffuse a bright pink or red into a paler base. This creates a glowing, radiating effect that looks like an energy field.
The gradient is circular rather than linear like a standard ombré. It gives the nails a dreamy, spiritual vibe. The soft focus of the color blending is very visually pleasing and calming.
You can layer a chrome powder over the aura for a mystical, futuristic twist. Or keep it creamy and matte for a more grounded look. It is a trendy design that signals you are up-to-date with nail fashion.
Checkered Pattern
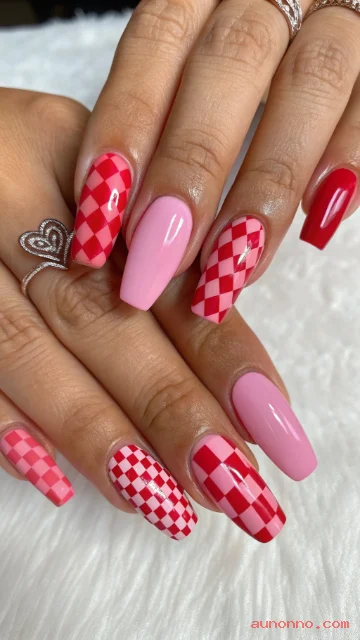
Checkerboard prints are funky, skater-inspired, and can be made romantic with color. Swap the traditional black and white for pink and red squares. You can do a full nail of checks or just a funky French tip.
This pattern requires precision, so using a stamping plate or stickers helps. If painting by hand, use a grid to guide your lines. It is a bold, graphic look that makes a strong statement.
Warped or wavy checkerboards are a modern variation on this classic print. They look trippy and cool, adding a unique flair. This design shows you have a fun and quirky sense of style.
Kiss Marks
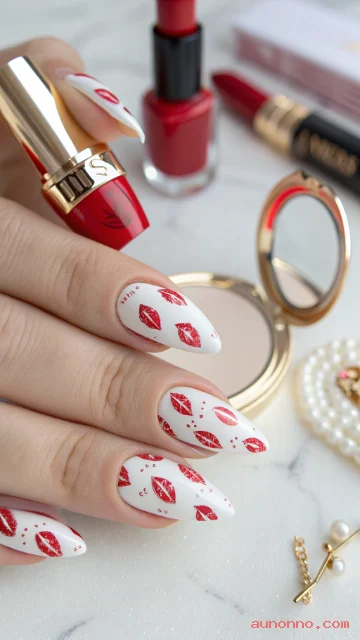
Nothing says Valentine’s Day quite like a lipstick kiss. Paint realistic lip prints on a white or nude background. You can use a stamping plate to get the detailed lines of the lips perfect.
Red and hot pink are the obvious color choices for the kisses. Make them look glossy by adding a top coat, or matte for a stamped look. Scattered kisses look flirty and playful.
This design is a bit cheeky and very literal for the holiday. It is perfect if you want your nails to do the flirting for you. Pair it with a matching red lipstick for a cohesive beauty look.
Gold Foil Flakes
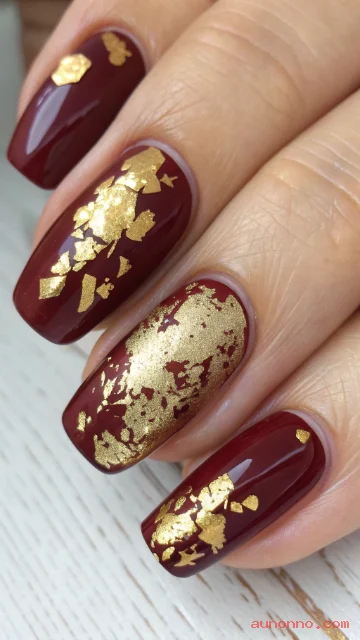
Gold foil adds a luxurious, scattered metallic texture to any manicure. Apply bits of gold leaf over a deep wine red or burgundy polish. The contrast between the dark red and the bright gold is rich and regal.
You don’t need to be precise with foil application; irregular shapes look better. Use a tweezer to place small flakes onto a tacky layer of polish. Seal it well so the edges of the foil don’t peel up.
This look mimics the appearance of expensive jewelry or gilded art. It is sophisticated and perfect for a fancy dinner date. The gold catches the light in a subtle, elegant way.
Minimalist Dots

Sometimes less is truly more when it comes to nail art. A single dot at the base of each nail is clean and modern. Use a red dot on a nude nail, or a white dot on a red nail.
This design lengthens the look of the nail bed by drawing the eye down. It is incredibly easy to do yourself with a toothpick or bobby pin. It is the ultimate low-maintenance Valentine’s look.
You can also arrange dots in a line or a triangle for geometric interest. But the single dot remains the most chic and editorial option. It works for any age and any professional setting.
White Lace Details

Lace patterns evoke feelings of romance, weddings, and vintage elegance. Use a white stamping polish to apply intricate lace designs over a sheer pink base. The result looks like delicate fabric draped over your nails.
This style is very feminine and intricate without being loud. It adds texture and visual interest upon closer inspection. It is a timeless look that never goes out of style.
You can do a full nail of lace or just the tips for a lacy French. A matte top coat can make the white lines look even more like real thread. It is a soft, beautiful choice for the holiday.
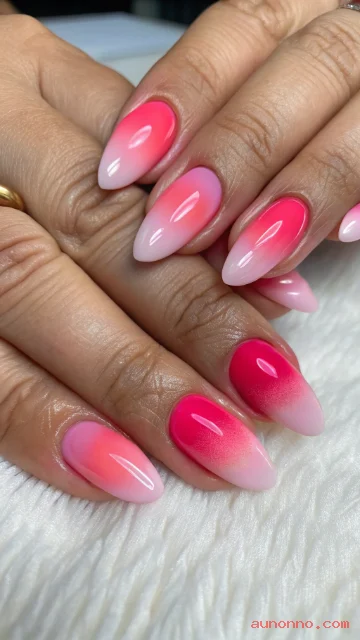
Skittle Nails (Pink Gradient)
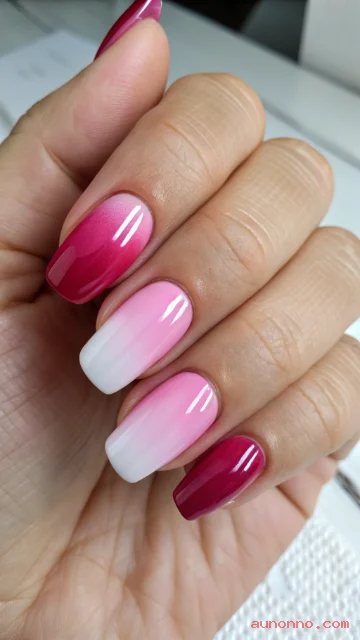
The “Skittle” manicure involves painting every nail a different color. For Valentine’s Day, create a gradient of pinks from thumb to pinky. Start with a deep berry, then magenta, bubblegum, pastel pink, and finally white.
This requires no nail art skills, just five different bottles of polish. It is colorful and coordinated without matching perfectly. It is a fun way to wear all your favorite pink shades at once.
The gradient effect is pleasing to the eye and very harmonious. It looks intentional and styled rather than random. It is a simple concept that delivers a big visual impact.
Strawberry Fruit Art
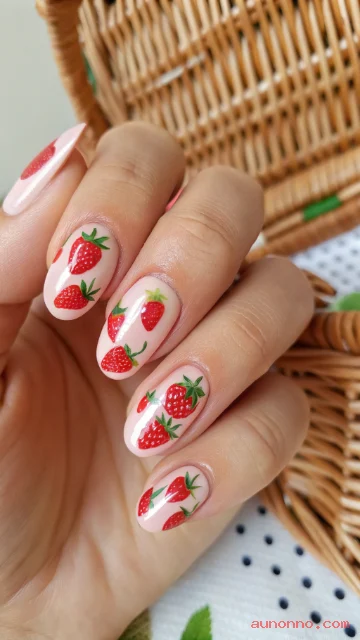
Strawberries are cute, red, and heart-shaped, making them perfect for this holiday. Paint tiny strawberries on a pink or white checkered background for a “picnic” vibe. Or, simply paint red strawberries on a nude base.
The green leaves add a nice contrast color to the usual red and pink palette. This cottage-core aesthetic is very popular and sweet. It feels fresh, wholesome, and a little bit rustic.
You can make the strawberries look realistic or cartoonish. Adding little white or black seeds gives them texture. It is a cheerful design that brings a smile to your face.
Rhinestone Cuff
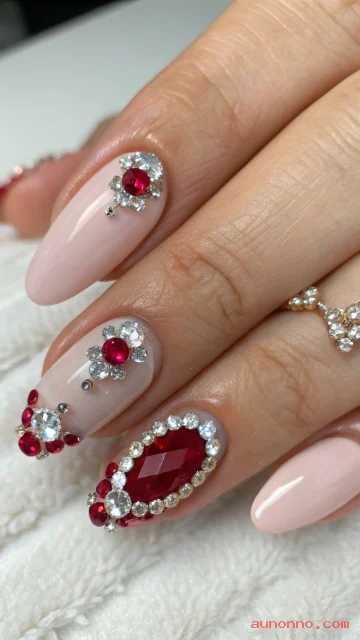
Add sparkle to your nails by lining the cuticle area with small crystals. This “cuticle cuff” looks like a necklace for your nail bed. Keep the base color simple, like a nude or a soft blush.
The crystals catch the light and add instant glamour to the manicure. It is a way to wear bling without covering the whole nail. It looks expensive and high-end.
Use different sizes of rhinestones for a tapered effect. Clear crystals are classic, but red or pink gems fit the theme well. Ensure you use a strong gem gel to keep them secure.
Bloody Drips
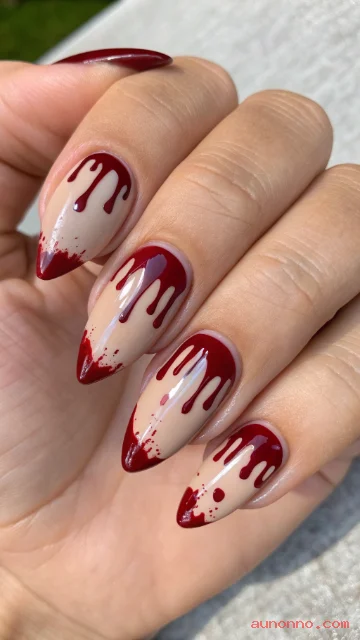
For a horror-themed or anti-Valentine’s look, try the blood drip design. Paint a nude base and use a dark red polish to create drips coming from the cuticle or tip. It looks spooky but also strangely appropriate for the “bleeding heart” concept.
This is a favorite for those who prefer Halloween to Valentine’s Day. It is edgy, dramatic, and definitely a conversation starter. The red color keeps it tied to the holiday color scheme.
Make the drips look 3D by adding a highlight of white or a shadow. A glossy top coat makes the “blood” look wet and fresh. It is a bold choice for the adventurous nail art lover.
Split Color
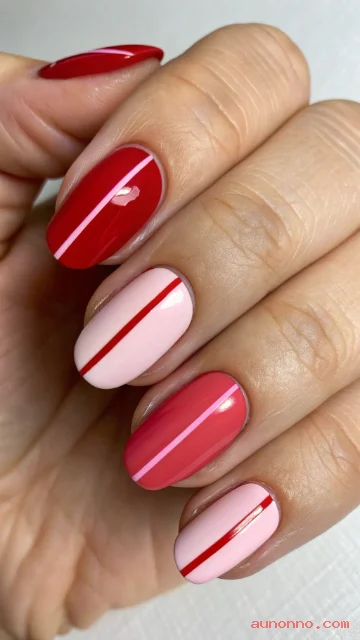
Cannot decide between two colors? Split the nail right down the middle vertically. Paint one half red and the other half pink for a color-blocked look.
This geometric design is modern and visually striking. Use striping tape to get a perfectly straight line down the center. It creates a cool duality and balance on the nail.
You can switch the colors on each finger for an alternating pattern. It breaks up the nail width and can make nails look longer. It is a simple technique with a bold result.
Yin Yang Hearts

Update the classic yin yang symbol by curving the line to create a heart shape. Use contrasting colors like pink and red, or black and white. It symbolizes balance and connection, which is a great message for love.
The swirling shape of the yin yang fits naturally into a heart outline. It is a bit retro and very symbolic. It represents two halves making a whole.
This design works best on an accent nail due to the detail required. Keep the other nails solid to let the design stand out. It is a thoughtful and meaningful manicure choice.
Confetti Party
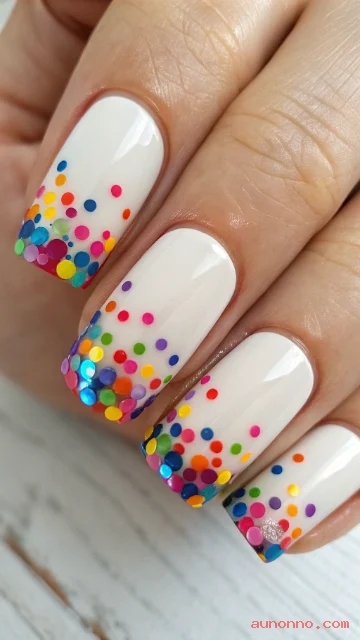
Celebrate love with a burst of confetti on your nails. Use a clear polish loaded with multi-colored circular glitters. Apply it over a bare nail or a white base for a fun, party-ready look.
The colorful dots look like a celebration in a bottle. It is festive, happy, and not too serious. It reminds you that Valentine’s Day should be fun.
You can concentrate the confetti at the tips or the base. It is impossible to mess up because random placement looks best. It is the ultimate easy, low-stress nail art.
FAQ
How long do these Valentine’s Day nail designs typically last?
With proper preparation and a good top coat, a regular polish manicure can last 5-7 days. Gel manicures can last 2-3 weeks without chipping.
Can I do these designs on short natural nails?
Absolutely! Most of these designs, like the micro hearts, solid colors, and French tips, look fantastic on short nails. You simply scale down the size of the art to fit the nail bed.
Do I need professional tools to create these looks?
Many designs can be done with household items like toothpicks (for dots) or scotch tape (for lines). However, a few inexpensive tools like a dotting tool and a thin liner brush make the process much easier.
What is the best red nail polish for Valentine’s Day?
The “best” red depends on your skin tone. Cool skin tones look great with blue-based reds, while warm skin tones shine with orange-based reds. A classic true red usually flatters everyone.
How can I remove glitter polish easily?
Soak a cotton ball in acetone, place it on your nail, and wrap the fingertip in aluminum foil for 5-10 minutes. The foil traps the heat and helps the remover break down the glitter glue.
Are press-on nails a good option for Valentine’s Day?
Yes, press-ons are a great temporary option if you want intricate art without the salon price or time. Many brands release specific Valentine’s Day collections in February.
How do I stop my nail art from smudging?
Wait for your design to be dry to the touch before applying a top coat. Float the top coat brush over the nail with a thick bead of polish so the bristles don’t drag through the wet art.
Conclusion
Choosing the right 26 valentines day nails designs is about matching your mood to your manicure. You might prefer the quiet elegance of pearl accents or the loud statement of neon hearts.
No matter which style you choose, taking the time to care for your nails is a great act of self-love. Remember that the best accessory you can wear is confidence, and a fresh set of nails always helps with that.